Tuesday, February 26, 2013

Sweet Potato Quinoa Fritters


It finally got me.  The flu.  You hear in the news about how it's spreading so badly this year, but I just assumed I'd be OK.  There I stood in my coworker's office last week, telling her how great it is that I don't get sick as frequently as I used to. That was my downfall.  Two days later, I made it through only a morning of work before I was forced to go home to my couch.  Thankfully it was a fairly mild strain, and I was back in action soon enough.  

While I hated feeling crappy and missing work and social engagements, the silver lining was that it forced me to slow down.  I read a new book, caught up on my DVR, and took lots of naps.  One day when I was feeling especially energetic I made myself lunch.  I find that lunch is such a luxurious meal to eat at home because so frequently you grab a bite on the run, sit at your desk and keep working while you eat, or are out at a restaurant.  When you actually have time to fix yourself something healthy and eat it right away, not reheated two days later, and enjoy it in the comfort of your own home, lunch can be an incredibly enjoyable meal.

When I lived in Spain, we'd return home during siesta each afternoon, eat lunch with our host family, take a nap, and then continue about our day.  Each day had an amazing rhythm and allowed you to enjoy even a weekday lunch.

On this day that would have been glorious had I not been ill, I made myself one of my favorite quick dishes - sweet potato quinoa fritters.  They're full of protein and nutrition and incredibly tasty.  And you can serve them any number of ways. They're great plain and sprinkled with sea salt, or you could squirt them with some fresh lemon juice and top them with plain yogurt or sour cream.  They're great cold or reheated.  And like so many things, they'd be awesome leftover with a poached egg on top!


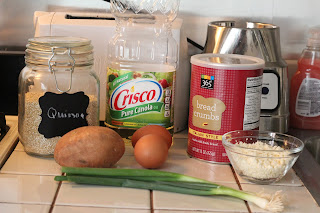
To make the fritters, you'll need quinoa, a small sweet potato, eggs, breadcrumbs, green onion, feta cheese, and canola oil.

This recipe is a great way to use up leftover quinoa you may have in the fridge.  I always say I'm going to make a big batch at the beginning of the week to use in salads and as a side dish, but rarely take the initiative.  If you're more on the ball than I am, then you already have cool quinoa to use.  If not, put 1 cup quinoa and 2 cups water in a medium saucepan, along with 1/2 teaspoon salt, and bring it to a boil.  Turn the heat down to low and let it simmer for 15-20 minutes, or until the quinoa is soft and fluffy.

While the quinoa is cooking, prepare the green onions by chopping them finely and peel and grate the sweet potato.


Once the quinoa is cooked, set it aside to cool slightly.  Stirring it will help some of the heat leave more quickly.  Then, in a large bowl, mix together all of the ingredients, along with 1/2 a teaspoon of salt and ground black pepper to taste.


Now it's time to cook the fritters.  In a large frying pan, heat a couple tablespoons of oil over medium high heat.  Once it's hot and the oil is shimmering, drop about 3 tablespoons of the quinoa mixture onto the pan to form one fritter.  It's important to wait until the oil is hot, or else the fritters will just absorb all the oil, and no one needs that.


Cook the fritters on this side for 3-4 minutes, or until they're nice and browned.  It helps to turn them halfway through so that they brown evenly; you can lift up a corner with a spatula to check for brown-ness.  Then flip!  Carefully, so that you don't splash yourself with oil.


Once they're evenly browned on each side, take them out of the pan and let them drain on some paper towel.  


And that's it!  Enjoy!


Sweet Potato Quinoa Fritters
Adapted from Canelle et Vanille

1 cup uncooked or 3-4 cups cooked quinoa
1 small sweet potato, peeled and grated
3 green onions, finely chopped
2 eggs, lightly beaten
1/3 cup feta cheese
1/4 cup bread crumbs (toast a slice of gluten free bread and blend in food processor to make this meal gluten free)
1/2 teaspoon salt
Ground black pepper to taste 
Canola oil for frying

Cook quinoa according to package, if necessary. Set aside to cool.  

In large bowl, mix together all ingredients except oil and stir lightly to combine.  Heat 2-3 tablespoons canola oil in a large frying pan over medium high heat.  Drop 3 tablespoons of quinoa mixture onto pan to form one fritter; continue to fill pan.  Cook on each side 3-4 minutes or until browned.  Set on paper towel to drain.  Enjoy immediately.

Thursday, February 21, 2013

Sesame-Spiced Turkey Meatballs and Smashed Chickpea Salad


Like so many food blog lovers, I was anxiously awaiting the release of the Smitten Kitchen Cookbook last fall.  Deb's blog is arguably one of the best out there, so I could not wait to try her new recipes in her long-awaited cookbook.  Lucky for me, Deb's book tour swung through DC, so we got to see her at Politics and Prose.  So exciting and inspiring!


She still has a few appearances to go, hopefully near you!  

Her cookbook does not disappoint.  I want to try ALL the recipes (and will one day!), but one in particular stood out.  A friend told me she made this for her boyfriend, and that it was so good they just stared at each other with wide eyes.  With that, it became the first of Deb's recipes that I made.  

It takes two steps: first the meatballs, then the chickpea salad.  

Start with the meatballs:


Prepare the ingredients: ground turkey, breadcrumbs, water, spices, egg, and sesame seeds.  The original recipe calls for Aleppo pepper, but I used regular ground black pepper. I also used store bought bread crumbs instead of making my own.

First, toast the sesame seeds.  Spread them in an even layer on a cookie sheet and bake at 350 degrees for 5 to 10 minutes.  It doesn't take very long, so be sure not to burn them!


In a medium bowl, mix all of the ingredients lightly with a fork.


Line a baking sheet with foil or parchment paper.  Wet your hands, and form the turkey mixture into small meatballs, about 1 1/2 inches (golf ball sized, according to Deb).  Place them on the baking sheet.  


Heat several tablespoons of canola or vegetable oil in a large skillet over medium high heat.  Add the meatballs, leaving some room between them and working in batches if necessary.  Brown them on all sides, turning until completely browned.


Once browned, move the meatballs back onto the baking sheet.  Bake them in the oven at 400 degrees for 10 - 15 minutes and then set them aside.


Meanwhile, make the smashed chickpea salad.  In a large bowl, mix two cans of chickpeas, rinsed and drained, or 1 3/4 cups cooked chickpeas, sliced green olives, spices, lemon juice, and garlic.  


Mash it with a potato masher, large fork, or pastry blender until it's coarse but not mushy, like this:


Now usually I hesitate buying special ingredients for a recipe and try to get by with what I already have in my pantry, like the pepper.  This salad calls for a spice called sumac though, which I splurged for because the taste really makes the dish.  According to Deb, it's "a dark-red ground powder that tastes almost like a sour paprika and is used a lot in Middle Eastern cooking."  I was intrigued, and it was worth it!  Sumac adds a nice, dynamic flavor to this otherwise simple salad, and I really liked it.


Next, drizzle the salad with olive oil and sprinkle with more sumac to make it look pretty.  Serve it cold or room temperature, topped with the turkey meatballs.  The cool salad and warm meatballs work SO well together.  Plus, it works well re-heated as leftovers, too.  Make sure you only heat up the meatballs, though.  Enjoy!


Sesame-Spiced Turkey Meatballs and Smashed Chickpea Salad
Adapted from the Smitten Kitchen Cookbook

Meatballs
1 pound ground turkey
2/3 cups breadcrumbs
1/4 cup water
1/2 teaspoon salt
1 large egg, beaten
2 cloves garlic, minced
1/2 teaspoon ground cumin
1/2 teaspoon ground coriander
1/2 teaspoon Aleppo or black pepper
1/4 teaspoon red pepper flakes
2 tablespoons toasted sesame seeds
Canola oil to coat pan

Preheat oven to 400 degrees. In a medium bowl, lightly mix all ingredients until just combined.  Heat several tablespoons oil in a large pan.  With wet hands, form 1 1/2 inch meatballs and brown in pan, turning occasionally.  Place on a baking sheet and bake for 10 - 15 minutes.

Chickpea Salad
2 cans chickpeas, rinsed and drained, or 1 3/4 cups cooked chickpeas
1/3 cup sliced green olives
1/2 teaspoon ground sumac, plus more for garnish
2 tablespoons  freshly squeezed lemon juice
1 clove garlic, minced
Pinch cayenne pepper
1/4 teaspoon salt
Olive oil
Option: Chopped fresh parsley

In a large bowl, combine everything but the olive oil and mix to combine.  Using a potato masher, large fork, or pastry cutter, smash the mixture until coarse but not mushy.  Drizzle with olive oil and toss.  Garnish with additional ground sumac.  Serve with Sesame-Spiced Turkey Meatballs.  

Tuesday, February 19, 2013

Simple Crusty Bread


I love making homemade bread. It seems like something that should be difficult, intimidating, and labor intensive, but it's really very easy.  It does takes several hours from start to finish, but the amount of labor involved really only takes about 15 minutes. The rest is simply rising and baking, allowing you to go about your day. It smells wonderful as it bakes, and there's nothing better than biting into bread still warm from your own oven.

A friend of mine first introduced me to this recipe at a dinner party.  She served it warm, with garlic infused olive oil and I fell in love.  It's rustic and crusty, yet soft inside. Perfect for dipping into this soup, eating with a smear of butter, or even slicing and making into garlic bread.  

The crazy thing is that you only need four ingredients: flour, water, yeast, and salt.


Start with lukewarm water.  It should be warm to the touch but not at all scalding.  Add the yeast and salt and let it sit for 5 minutes.  


Slowly stir in the flour until a sticky dough forms.  


Transfer the dough into a greased bowl so it won't stick to the sides when it comes time to take it out.


Cover the bowl with a towel and let the dough sit at room temperature for 2 - 5 hours.


After the dough has risen, it will look something like this.  Mine didn't rise very well, which might be attributable to yeast that was not very active or the fact that the salt was added early in the bread-making process (this article does a good job explaining the purpose of salt in bread making, if you want to get nerdy with me).  At this point you can either bake the dough or store it in the fridge for up to two weeks.


There are a few options for how to bake the bread.  I cut the dough in half and shaped it into small loaves on a greased cookie sheet, like this:


You could also make one big loaf and bake it on a cookie sheet or in a bread pan. Alternatively, you can follow the original instructions if you have a pizza stone.

Sprinkle dough with a small amount of flour and score the top with a sharp knife.

  
Place a pan in the bottom of the oven with a couple of inches of water in it to aid in baking the dough.  Bake the dough in a 450 degree oven for 20-25 minutes for two small loaves.  When it's finished it will be brown and firm to the touch, like this:


Slice and enjoy!


Simple Crusty Bread
Adapted from New York Times

1 1/2 cups lukewarm water
2 1/4 teaspoons (one packet) yeast
2 1/4 teaspoons salt 
3 1/4 cups flour

Pour the water into a large bowl and sprinkle in the yeast and salt.  Let sit for 5 minutes. Gradually stir in the flour until a sticky dough is formed.  Transfer the dough into a greased bowl and let stand, covered, for 2 - 5 hours.  Divide the dough in two and form into two loaves on a greased cookie sheet.  Bake in a 450 degree oven for 20 - 25 minutes, along with a second pan with 1-2 inches of water.  

Tuesday, February 12, 2013

White Bean, Sausage, and Greens Soup


I'm back!  To all of you lovely readers out there, Happy Hanukkah, Merry Christmas, Happy New Year, Inauguration Day, MLK Day, and all the other big events that I've missed over the past couple months.  I've been incredibly busy, but things have settled down to a dull roar and I'm beyond excited to get back to sharing some new dishes with you.  

It's the heart of winter here on the east coast, which of course means comfort food.  Unfortunately Nemo missed DC, but there's the possibility for some snow later in the week. Really, all I want is another Snowpocalypse, because I'm SO good at being snowed in.  Either way, this time of year definitely calls for lots of soup.  This version is hearty and healthy, and vibrant and full of color to perk up a dark winter day.  It's also a great excuse to eat a couple of slices of freshly baked bread (which I'll share soon)! 

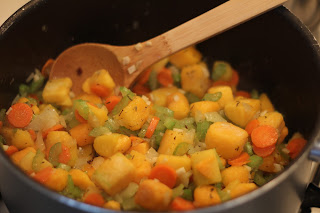
Start with some vegetables: carrots, celery, onion, and garlic.  


Dice them up, and sauté in olive oil in a large saucepan.  Save the garlic for the last minute of sautéing. Season with salt, pepper, and red pepper flakes.  

  
Next, peel and cube a butternut squash.  Fresh is best, but I actually used frozen, which I do not recommend unless it's the only option.  In my case, there were absolutely no butternut squashes available in the store so I bought a bag of frozen squash.  I found that it got soft and mushy once it was cooked though, so the extra work of a fresh squash is definitely worth it if it's available.  

Add the squash and some thyme (fresh if you have it, but dried is OK too).  Sauté for three more minutes.  


Now add the liquid: one carton of chicken broth and a can of diced tomatoes.


Bring the soup to a boil, then lower the heat and simmer, uncovered, for at least 15 - 30 minutes.  The longer it cooks, the more the flavors develop.  You can also add additional liquid here (1-2 cups of water) depending on how much broth you prefer.  I chose not to add any extra, since I'm not a huge fan of broth and like my soup to be almost stew-like.

While it's simmering, prepare the greens, beans, and sausage.  You can use any type of greens you prefer - collard, kale, swiss chard, or anything similar.  I used dinosaur kale.  Rinse it off, cut out the stems, and cut it into bite size pieces.  


Drain and rinse the beans.  I used Great Northern beans, but you can use Cannellini or Navy instead.  This is a good explanation of the difference between the three.


Halve and slice three to four chicken sausages and sauté in small pan to lightly brown.


When the soup is done simmering, add the sausage and beans and stir.


Next, add the greens.  The greens will wilt once they're heated, so slowly stir to incorporate them into the soup.


Season with additional salt and pepper to taste, and then it's ready to serve!  With some warm crusty bread, of course.  

This soup reheats and freezes well.  Freeze individual portions in a Ziploc freezer bag and defrost in the fridge before reheating.


White Bean, Sausage, and Greens Soup
Adapted from Simply Scrumptious

1 yellow onion, diced
3 carrots, sliced
4 stalks celery, sliced
4 garlic cloves, finely chopped
1 small butternut squash, peeled and cubed
1 tablespoon fresh thyme, chopped or 1 teaspoon dried thyme
4 cups chicken broth
1 can diced tomatoes
1 can white beans, drained and rinsed
4 cups greens, chopped
3 - 4 cooked chicken sausages, sliced
Red pepper flakes
Salt and pepper to taste
Olive oil
  • Saute onion, carrots, and celery in olive oil for 5 minutes.  Season with salt, pepper, and red pepper flakes.  Add garlic and cook for 1 minute longer.  Add butternut squash and thyme and sauté for 3 more minutes.
  • Add broth, diced tomatoes, and 1 - 2 cups water and bring to a boil.  Lower the heat and simmer for 15 - 30 minutes.  
  • Add the white beans and sausage and cook for 10 minutes.  Add the greens and stir until greens are wilted.  
  • Season with additional salt and pepper to taste.  Serve hot with crusty bread.  
 
site design by designer blogs