Wednesday, December 12, 2012

To be continued...

Photo via
Happy holidays everyone!  This post is very overdue and I apologize for my radio silence lately.  Over the past few months I've been working on a personal project and am finally hitting the home stretch!  I've missed sharing the new recipes I've tried lately, but promise to be back in early 2013 with some fun new ideas.  

While I buckle down, I hope everyone's kitchen's are looking as lovely and peaceful as this one.  In the meantime, here are a few recipes from last year to get you inspired for the season!

So simple yet so festive

Gluten free

Beautiful and sure to impress

See you all in January!

Tuesday, October 23, 2012

How To: Roast a Chicken


To anyone who is intimidated by cooking an entire chicken, stop!  Yes, it may seem strange to cook the entire chicken, rather than have each piece pre-cut for you.  Sure, boneless-skinless chicken breast is healthy, but when chicken is cooked in its entirety, with skin and bones, white meat and dark meat, the result is incredibly tasty and aromatic.  

AND INCREDIBLY EASY!  So easy it shouldn't be allowed, like you're cheating somehow.  

Plus, your kitchen will smell like it's a holiday, but really it will just be Sunday.  That's my favorite day to roast a chicken, so I have leftovers to last me through the week.  After I cook the chicken and eat some for dinner that night, I cut off the rest of the meat and save it for lunches and quick dinners throughout the week.  Of course, there are a plethora of recipes that utilize leftover chicken, but you don't even have to go that far.  Eat it plain, put it on a salad, a sandwich, or make chicken salad.  Super easy.  

This is a basic recipe for roasting a chicken, a good starting place, but it's infinitely adaptable.  I have yet to branch out though, because this version is so delicious I just haven't felt the need to change it!  

To start, line a large roasting pan (I use a 13 x 9 baking pan) with aluminum foil and spray it with cooking spray.  Prepare the chicken by first removing the giblets - extra parts of the chicken stored in a little bag in the cavity of the chicken.  Depending on where you buy the chicken, the giblets may have already been removed (Whole Foods removes them but Costco does not, for example).  Next, rinse the chicken under cold water and pat it dry with paper towels.  Place it in the roasting pan.  

And wash your hands frequently throughout the process, please.  


This is a perfect instance in which you should do as I say and not as I do.  There should really be a couple of inches on each side of the chicken, so make sure you use a big enough pan.  

Now pour a few tablespoons of olive oil over the chicken and spread it around with your hands.  Next, generously sprinkle salt and pepper over the entire chicken.


Now you're going to stuff some aromatics into the cavity of the bird.  This recipe calls for garlic and lemon.  Take a whole head of garlic (or as much garlic as you have on hand, if you don't have an entire head - it still works) and cut it in half crosswise, so the each clove is cut down the middle.  Cut a whole lemon in quarters.  Stuff as much garlic and lemon into the cavity as will fit.  


To avoid burning, you need to tie the legs together.  This also holds in the aromatics.  Cut a few inches of kitchen twine (which you should be able to find in the grocery store) and tie the legs.  


Bake the chicken at 425 degrees for about 1 hour and 15 minutes.  You'll know it's done when the juices that run out of the chicken are clear.  The best place to test this is between the leg and the thigh.  Once it's done, remove from the oven and "tent" foil over it to retain the heat.  Let it stand like this for 10 minutes.


Once it's done, you're left with a beautifully browned chicken.


If you're entertaining, you could put the entire chicken on a platter and cut it at the table.  If it's just a normal Sunday night, I recommend cutting it on a platter with a groove on the sides to catch the juices.  No one wants chicken juice all over their kitchen.  Start by removing the wings, then the drumsticks and thighs (which are below the drumsticks).  Then you can slice off the breast.  


Then it's time to enjoy it with your favorite sides!  And get ready to make it again soon, because this is sure to be a new go-to recipe.


Simple Roasted Chicken
Adapted from Barefoot Contessa, How Easy Is That?: Fabulous Recipes and Easy Tips

1 4-5 pound chicken
1 lemon, quartered
1 whole head of garlic, cut in half crosswise  
Olive oil
Salt and pepper 

Preheat the oven to 425 degrees.

Line a medium roasting pan with aluminum foil and spray with cooking spray.  Remove the giblets from the inside of the chicken, rinse the chicken, and pat dry with paper towel.  

Place the chicken in the roasting pan and rub with olive oil.  Sprinkle generously with salt and pepper.  Stuff the lemon and garlic in the cavity of the chicken and tie the legs with cooking twine.  

Place the chicken in the oven and bake for approximately 1 hour and 15 minutes, or until the juices are clear when the chicken is pierced with a knife.  

Remove from the oven and tent with aluminum foil for 10 minutes.  Carve and serve.  

Thursday, October 11, 2012

Pumpkin Walnut Muffins


If you've known me during the fall, you know that I love pumpkin.  I'll take it in my pancakes, coffee, chili, pies, and, most importantly, beer.  Like this one, which took me 3 full years to find in DC.  

There are two types of pumpkin to cook with - canned or fresh.  For canned pumpkin, I broke down and bought an enormous pack from Costco.  For fresh pumpkin, you simply bake a sugar/pie pumpkin and scoop out the flesh (more detailed instructions in this post).  You can then freeze it in 1-cup increments in small freezer bags to pull out whenever you need it.  

This year, pumpkin picking just hasn't been in the cards, so it's been canned pumpkin all the way.  Which makes it very easy to whip up a quick batch of pumpkin walnut muffins on a work night.  They make your kitchen smell like fall and are wonderful fresh or grilled in the morning.  I even had to give some away to friends so that I wouldn't eat them all myself.  

To start, melt the butter in a small bowl in the microwave and let it cool.  Completely forget to take a picture of it.  Next, prepare the walnuts by chopping them finely on a cutting board.  I made the mistake of not chopping them finely enough, which caused some of the larger pieces to burn in the oven.  I recommend chopping them quite coarsely.  Set them aside for later.


Now mix all of the dry ingredients together in a large bowl.  About the flour: The recipe calls for 1 cup white and 1 cup white whole wheat flour.  I used 1 cup white, 3/4 cup whole wheat, and 1/4 cup wheat germ.  The recipe is pretty forgiving, so use whichever flour you prefer (or whatever you have on hand).  


Now mix all the wet ingredients together, including the cooled butter.  This is why it's important to let it cool - you don't want hot butter mixed in with the egg.  Make a well in the center of the dry ingredients and pour all of the wet ingredients in, mixing well.


If you're using raisins or chopped dates, now would be the time to fold them in.  I didn't have any on hand, so I skipped them, but I think they would add a great sweetness and extra moisture.  You can't go wrong either way, though. 
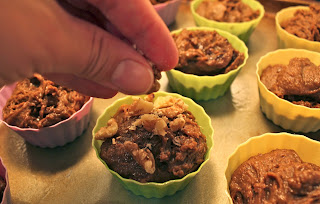
Next you're going to prepare the muffin tin.  Here you have a few choices - a muffin tin lined with cupcake papers or sprayed with cooking spray, or silicone baking cups.  I used silicone baking cups and sprayed them with cooking spray.  These little guys are the greatest - they're super cute, the muffins pop right out of them after they're cooked, and they're reusable.  

  
Using a large spoon, drop enough batter into each cup to fill it almost to the top.  


Here's where the walnuts come in.  Using your fingers, sprinkle the chopped walnuts over the batter.  Press them into the batter so that they don't fall off later  


Bake them in a 400 degree oven for 20-25 minutes.  You'll know they're done when you insert a toothpick into the center and it comes out without any batter stuck to it.  Let them cool for a few minutes, then transfer them to a rack to cool even more.  


You can serve them right away when they're still warm, or they'll keep for several days in an airtight container.  You could probably wrap them well and freeze them, but I can't attest to the success of this method.  They're best enjoyed with a hot cup of coffee or a cold glass of milk.  Happy fall!


Pumpkin Walnut Muffins
Adapted from Gourmet
Yield: 12 muffins

Ingredients
1/2 cup unsalted butter
3/4 cup cooked pumpkin (canned or fresh)
1/4 cup milk or buttermilk
2 large eggs
3 Tablespoons unsulfured molasses
1 teaspoon vanilla
1 cup flour
1 cup white whole wheat flour, all-purpose flour, or your flour of choice
1 1/2 teaspoons baking powder
1 teaspoon cinnamon
1/2 teaspoon ground ginger
1/4 teaspoon ground cloves
1/8 teaspoon grated nutmeg
1/2 teaspoon salt
1/4 teaspoon baking soda
3/4 cup packed brown sugar
3/4 cup chopped pitted dates or chopped raisins (optional)
3/4 cup finely chopped walnuts

Preheat oven to 400 degrees.  In a small bowl, melt the butter and set aside to cool.

In a large bowl, mix together the flours, baking powder, cinnamon, ginger, cloves, nutmeg, salt, baking soda, and brown sugar.  In a smaller bowl, mix together the butter, pumpkin, milk, eggs, molasses, and vanilla.  Make a well in the dry ingredients and pour the wet ingredients in.  Mix until well incorporated, then fold in the dates.  

Prepare muffin tins using paper liners or cooking spray.  Drop spoonfuls of batter into each cup to fill them approximately 3/4 high.  Sprinkle walnuts over the batter, pressing them in so that they stick.  Bake at 400 degrees for 20-25 minutes or until a toothpick inserted in the center of a muffin comes out clean.  Cool for several minutes before removing from the muffin tin.  

Wednesday, October 10, 2012

Can't Get Enough: Pumpkin


This pretty much sums up my eating habits lately.  Is any one else as obsessed with putting pumpkin in everything as I am? What have been your favorite pumpkin recipes this season?  More pumpkin love to come tomorrow....

Photo via Scoutmob

Tuesday, October 9, 2012

Happy Trails Adventure Cookies


I originally made these cookies over the summer for a day of white water rafting and stand up paddleboarding.  It was obviously going to be the most adventurous day of the season (I mean, we did a ropes course that was 65 feet high), so I wanted to bring a snack that was not only delicious, but would provide lots of energy and keep us going (and not falling) for a while.  

Angela's Happy Trails Adventure Cookies were the perfect recipe.  They're pretty healthy as far as cookies go - no added oil and mostly vegan - and are packed with nuts and seeds that would provide lots of protein and nutrients.  Plus, using gluten free oats would make them gluten free.  They were fairly quick and easy to make, so it left me just enough time to get my packing done for the trip.  

While it might not be water sports weather any longer, I still wanted to share this recipe because they'd be great for lots of outdoor fall activities that are sure to be on your calendar soon.  Like pumpkin picking and hiking!  Here, a few pictures from a trip to Harpers Ferry, WV last fall. And yes, I think they'd be perfect for a few miles on the AT!


Happy Trails Adventure Cookies
Adapted from Oh She Glows
Yield: 14-16 cookies

Ingredients
1 cup walnuts
1 cup + 1 Tablespoon oat flour (blended rolled oats)
1/4 cup + 2 Tablespoons rolled oats
1/2 teaspoon cinnamon
1/2 teaspoon fine grain sea salt
1/2 teaspoon baking soda
1 Tablespoon ground flax seed
1/4 cup maple syrup
3 Tablespoons honey
1/2 Tablespoon vanilla extract
1/3 cup dried sweetened cranberries
3 Tablespoons pepita (pumpkin) seeds
3-4 Tablespoons chocolate chips

Prepare the walnuts: Toast the walnuts on a baking sheet at 325 degrees for 6-8 minutes, stirring once.  Allow them to cool for several minutes.  Chop them in a food processor (or by hand) until they resemble small crumbs.  Set aside.

Increase the oven temperature to 350 degrees.  In a large bowl, mix the oat flour, rolled oats, cinnamon, salt, baking soda, and ground flax seed.  In a smaller bowl, combine the syrup, honey, and vanilla.  Pour the wet ingredients into the dry ingredients and mix well.  Fold in the cranberries, pepitas, and chocolate chips.  

Form the cookies with wet hands (dip them in water frequently to avoid the dough sticking to your hand) using approximately 2 Tablespoons of dough.  Firmly squeeze the dough together and place on a greased cookie sheet.  Bake at 350 degrees for 10-12 minutes, or until cookies begin to brown and are set.  

Can be stored in an airtight container for several days, if they last that long.  


Wednesday, October 3, 2012

African Curried Coconut Soup


I'm back!  After taking a pretty lengthy hiatus from The Kitchen Holiday, I'm happy to report that I'm back in the kitchen and ready to share some new recipes.  Since June, my summer got pretty hectic with lots of travel, work, and studying for the GMATs (so glad those are over!), that I just didn't have time to take any pretty photos or get any non-business themed writing done.  Now that things have settled down to a dull roar, I'm so excited to be back in this space and to share some new food ideas with you!  

Since we skipped right over the second half of summer and have reached the official beginning of fall, I've found myself craving warm, comfort food.  Sure, maybe it's still 80 degrees outside some days and I may or may not have worn shorts this weekend, but despite all that, my body is recognizing the change in the air and is ready to quiet down and embrace the season.  

To ease into autumn, I found a new soup that's light enough to be appropriate for this in-between time of the year.  This African Coconut Curried Soup is full of flavor, packs a little kick, and is satisfying with hearty chickpeas and brown rice.  Plus, it's gluten free and vegan.  I made a big batch on a Sunday so that I had leftovers to eat for lunch throughout the week, and it tasted great reheated.

To start, cook the rice.  You can use white or brown, whichever is your preference.  You could probably even substitute some other kind of grain if you wanted to, like barley or quinoa.  In a small saucepan, combine 1/2 cup of rice and 1 cup of water.  Bring it to a boil, then lower the heat and simmer for 30-40 minutes for brown rice, or 20 minutes for white rice.  Fluff the rice with a fork and set aside.


Next, prepare the vegetables.  Finely chop the onion, seed and chop the bell pepper, and, *very important*, remove all the seeds and the white flesh from the hot pepper and then finely dice it.  I don't handle spicy food very well, so I wanted to make sure the hot pepper was diced pretty small so that I didn't get any surprise spicy bites!


Now you're ready to actually make some soup!  In a large pot, heat the canola oil over medium heat.  Add the peppers and onion and cook them for about 5 minutes, or until they're soft.

While the vegetables are cooking, peel and chop the garlic.  


Add the garlic to the vegetables and cook for one minute longer.  

Now for the easy part - you just need to throw the majority of the remaining ingredients into the pot.  Add vegetable broth, chickpeas, a can of diced tomatoes, curry powder, salt, and pepper.  Stir it all together, then increase the heat to bring it to a boil.  Once it boils, turn the heat down to low, cover, and simmer for 10 minutes.  


After the 10 minutes are up, add the coconut milk and rice.  The recipe calls for you to wait to add these ingredients since coconut milk can separate if you boil it, and you don't want the rice to overcook.  That being said, I totally screwed that up and boiled the coconut milk and everything was fine, so don't sweat it.  It sure does look pretty though!


Stir everything together, cover it again, and heat over low to medium heat for 5-10 minutes longer.  You can serve the soup immediately, but it also tastes great as leftovers, as I can attest to after eating it for lunch for 4 days in a row.  It's also freezable, if you want to have some variety in your week.  Your choice!  

Enjoy, and sit back as the weather starts to get colder!


African Curried Coconut Soup
Adapted from The Tropical Vegan Kitchen
Yield: 4 servings

Ingredients
2 Tablespoons canola oil
1 medium onion, chopped
1 medium red bell pepper, chopped
1 hot pepper (jalapeno or similar), seeded and finely chopped
2 cloves garlic, peeled and finely chopped
2 cups low-sodium vegetable broth
1 15-ounce can chickpeas, rinsed and drained
1 cup diced tomatoes (canned or fresh)
1 teaspoon curry powder
1/2 teaspoon salt
Ground black pepper to taste
1 14-ounce can light coconut milk
1/2 cup rice (white or brown)

Cook the rice according to instructions and set aside.

In a large pot, heat canola oil over medium heat.  Add the onion, bell pepper, and hot pepper and cook until softened, about 5 minutes.  Add the garlic and cook for 1 minute longer.  

Add the vegetable broth, chickpeas, tomatoes, and spices into the pot and bring to a boil.  Lower heat and simmer for 10 minutes.  Add the coconut milk and rice and cook over medium heat for 10-15 minutes longer, avoiding bringing the soup to a boil.  

Serve immediately, refrigerate in an airtight container for 3-4 days, or freeze for several months.  

Friday, June 29, 2012

Happy Weekending!


I'm off to Charlotte for the weekend with some of my favorite adventurers and will get to try stand up paddle boarding for the first time!  Hopefully everyone will stay cool if they're affected by this heat wave (it's supposed to be 105 in Charlotte tomorrow??) and eat lots of popsicles. 

I made these cookies to give us energy while we try our hand at SPB, kayaking, and zip lining.  They're turned out wonderfully, so I'll be back next week to share them with you.

In the meantime, have a great weekend!

Photo via.

Thursday, June 28, 2012

Tortilla Espanola


Back in 2006 (so long ago!) I spent a wonderful summer in Seville, Spain "studying," living with a Spanish family, and doing loads of traveling.


It was only for one summer, but we were able to visit lots of different Spanish cities, northern Morocco, and (my favorite) Lagos, Portugal.  I'm not sure how I even managed to stay awake through all the fun we had, because we were waking up early and staying up late in order to fit everything in.  I stayed with this lovely couple, who exposed me to the way of life of real Spaniards.  I still wish we had siesta each afternoon in the states!


While the benefits of living with host parents can be debated, one of the biggest perks was the amazing food that Marta cooked for us each day.  To this day, I haven't found Spanish food that can hold a candle to her cooking.  Back then, I wasn't as interested in cooking as I am now, but I had the good sense to ask Marta to show me how to make my favorite dish, tortilla espanola.

Tortilla is my go-to beach food.  It's perfect eaten cold or at room temperature, which makes it a great picnic food in general.  You can eat it properly with a fork and knife, or grab a slice and eat it straight from your hand.  It's full of protein and flavor and cooks to the perfect texture and density.  In the summer months when hot food sounds down right detestable, tortilla is always a good bet.  Even better if you serve it with gazpacho, but that's a story for another day.

To start, peel the potatoes and cut them into paper thin slices.  The thinner the better.


Cut the onion and pepper into slices as well.


In a medium frying pan*, heat about 1 1/2 cups of canola oil over medium heat.  You should have approximately 1 inch of oil in the pan.  Add the potatoes, onion, bell pepper, salt and pepper and stir.  Salt and pepper is very important to the flavor, so don't skimp!  Make sure the oil is sufficiently hot before adding the other ingredients, or the potato will soak up the oil.  The oil won't cover all of the ingredients, so stir frequently.


Cook for approximately 15 minutes, or until you can easily insert a fork into the potatoes.  Remove the potatoes, peppers, and onions with a slotted spoon and place in a colander to drain any excess oil.  It's helpful if you put some paper towels under the colander to absorb the oil.


In a mixing bowl, beat the eggs and add the drained potato mixture.  Stir together.


Remove all but two tablespoons of the leftover oil from the frying pan.  Heat to medium once again and pour in the egg/potato mixture, spreading it out evenly.


Cover it and cook for approximately 10 minutes, or until the tortilla is browned on the bottom and set on the edges.  It might still be a little bit wet on top, which is fine.  It will look something like this:


While you're waiting for it to cook, play with the puppy.


Next, flip the tortilla over.  This can get a little tricky (hence the lack of photos of these steps - I'm only so coordinated!).  Place a plate that is wider than the frying pan on top of the frying pan.  Using pot holders, flip both the frying pan and plate over so that the tortilla is on the plate.  Slide the tortilla off the plate and back into the frying pan.  Cook it for about 5 - 10 minutes longer or until firm in the center and browned on the bottom.  Not as brown as in this picture, but you get the idea.


Remove the tortilla from the pan using the plate-flipping method and let it cool.  Slice it like a pie, and serve it either cold or at room temperature.  Extra points if you eat it on the beach!


* You can use a large frying pan to make a larger tortilla, but note that this makes it harder to flip.  Make sure you have a plate that is wider than the frying pan.  If you use a large frying pan, you can almost double the proportions of potato-egg.


Tortilla Espanola
Serves 4

3 medium potatoes, peeled and sliced very thinly
1/2 onion, sliced
1/2 bell pepper, sliced
6 eggs
1 1/2 cups canola oil
1 teaspoon salt
1/2 teaspoon pepper

In a medium frying pan, heat the oil over medium heat.  Add the potatoes, onion, bell pepper, salt and pepper and cook until a fork can be easily inserted in the potato, about 15 minutes.  Stir frequently and do not let it brown.  With a slotted spoon, remove the ingredients from the oil and place in a colander to drain.  Pour the oil out of the frying pan and set aside.  In a mixing bowl, beat the eggs and stir in the drained, fried ingredients.

Return two tablespoons of oil to the frying pan and heat over medium heat.   Add the egg and potato mixture, cover, and cook for 10 minutes or until almost set on the edges (some liquid will remain) and brown on the bottom   Flip the tortilla by placing a large plate over the frying pan and flipping the tortilla onto the plate.  Slide the tortilla back into the frying pan and cook for 5 - 10 more minutes or until set and browned.  Remove to a plate and cool.  Slice and serve cold or at room temperature.
 
site design by designer blogs