Tuesday, April 30, 2013

Spring Vegetable Risotto + weekend visit


Nothing makes a leisurely weekend better than a good friend to share it with.  A couple weekends ago, my good friend Rebecca came to visit from New York and we had a fabulous time. 

Rebecca is my oldest friend. We've been friends ever since we met at a family BBQ when I was 11, and despite a multitude of huge life changes, different schools, different cities, and plain old growing up, we've continued to be incredibly close.  We might not keep in touch on a daily basis, but we manage a visit to each other's adopted cities at least every 3 months.  And when we do see each other, it's all the more sweet because we pick up right where we left off and get to catch up on everything that's happened since we last visited.  It's quite therapeutic.  I'm lucky to have a lot of great friends in my life, but there's no substitute for years of history, and Rebecca and I have that.

We jumped right into her visit with happy hour at The Pig followed by cooking and wine in my kitchen and dinner on the roof.  I decided on a spring vegetable risotto, as it was just the right balance of light and seasonal vs warm and comforting.  


Risotto is a time consuming dish to make, but not at all difficult.  Sure, you have to stir it frequently for about 20 minutes as you add liquid, but it doesn't take much skill or labor.  Simply prepare the vegetables first and set them aside, then cook the rice.  Add the vegetables back in along with lots of butter and parmesan cheese, and you have risotto!  This recipe is topped with a poached egg (because they really do make everything better), which adds a delicious sauciness from the yolk and also some protein, since there isn't much in the rest of the dish. (For the best directions on how to poach an egg, see Deb's instructions, of course.) You can easily skip the poached egg if you prefer, especially if you're serving this as a side dish (to chicken, perhaps?)

The only unfortunate thing about the lovely time I had with Rebecca was that we didn't take any pictures as we made the risotto (I blame all the chatting and wine).  But do no fear!  Detailed directions are included below.  Enjoy!  Preferable outside with a glass of wine and a good friend :)


Spring Vegetable Risotto

2 cups frozen peas, cooked (or 2 cups fresh peas, shelled and cooked)
8 cups low-sodium chicken broth
4 tablespoons unsalted butter
1/4 pound mushrooms (crimini or chanterelle - I used crimini, which are just baby bellas)
2 tablespoons olive oil
2 large leeks, white and pale greens only, chopped
1 fennel bulb, chopped
4 garlic cloves, chopped
2 cups arborio rice
1 cup dry white wine (Three Wishes works perfectly here)
1 bunch spinach, torn into smallish pieces
1/4 cup chives, chopped
1 1/2 cups parmesan cheese, shredded (plus more for topping)
Salt and pepper to taste

In a medium saucepan, heat the broth, covered, over medium-high heat until it's just below a simmer.  Turn the heat to low, keeping covered, so that it stays warm.

Slice or halve the mushrooms, depending on their size.  Aim for bite-sized pieces. In a large saucepan, melt 1 tablespoon of butter over medium heat and add the mushrooms. Cook for several minutes and remove from pan; set aside.  

In the same pan, melt another tablespoon of butter and heat two tablespoons of olive oil over medium heat.  Add the leeks and fennel and cook for 3-4 minutes.  Add the garlic and cook for 1-2 minutes more, or until the vegetables are soft.  Stir in the rice and cook for 1-2 minutes.  Add the wine and stir to combine.  Stir occasionally until most of the wine is absorbed by the rice. Add 1 cup of the heated broth and stir occasionally until most of the broth is absorbed. Continue to add the broth in 1/2 cup increments, stirring frequently but not constantly, until the rice is soft and cooked through (taste test to check!), about 20 minutes.

Add the mushrooms, spinach, chives, parmesan cheese and remaining two tablespoons of butter and stir to combine.  The spinach will wilt.  Remove the pan from the heat; add salt and pepper to taste.  

Top with a poached egg if desired and serve immediately.

Note: Risotto reheats well and lasts for several days in the refrigerator.  Portions can also be frozen and enjoyed later.  Simply defrost and heat in the microwave.  

Tuesday, April 16, 2013

Gluten Free Peanut Butter Banana Pancakes

I've had this post planned for a while, but of course no one could have expected that yesterday's horrible events in Boston would occur. Before I go into the food post, I want to say that my heart goes out to the people in Boston.  I'm so grateful that no one I knew who was running or watching the race was affected and that there are such amazing first responders and medical staff in the city to take care of the victims.  I hope we can all focus on the positive and show that love can prevail in the face of terror.  
----------------------------------------------------------------------------------------------------------------------------------


It's been about two months since I've gone gluten free, and so far it's been going pretty well.  What I at first thought would be a very difficult diet change has actually turned out to be very manageable (with the exception of beer!).  There are so many alternatives to gluten-full foods, and I don't just mean the processed frozen foods you can buy at the grocery store.  Sure, I've tackled baking with gluten-free baking mix, coconut flour, rice flour, and xantham gum, but I've realized that there are also plenty of recipes that don't use flour at all.  


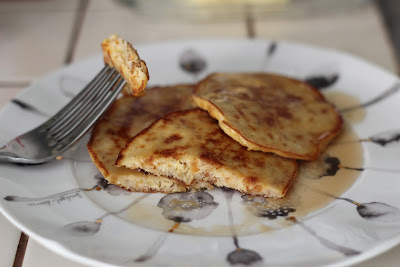
Like these pancakes I made last weekend.  It's no secret that I love to make pancakes. I've basically been making them since I was tall enough to see over the stove, so the thought of never again enjoying them on a relaxing weekend morning was kind of devastating.  Thankfully, my sister went gluten free years ago and has been my guide through this process.  She shared a gluten free pancake recipe with me that doesn't use any sort of flour, gluten or otherwise.  In fact, they only have three ingredients.  Three!! 


That's right - all you need for these pancakes are peanut butter, bananas, and eggs.  It's mind blowing how simple they are and that this will actually turn into a pancake, but trust me here - you won't be disappointed.  They're light and fluffy and perfect with a little butter and syrup.  Or nutella :) 

To make 1-2 servings, you'll need two of each - two bananas, two eggs, and two spoonfuls of peanut butter.  

To start, mash the bananas in a small mixing bowl.


Beat the eggs and add those them to the banana along with the peanut butter.  


Whisk or mash the ingredients together until it forms a smooth batter.  How much you have to whisk may vary depending on what kind of peanut butter you used.  I used freshly ground peanut butter that had been in the fridge, so it was pretty firm and needed a lot of mashing.  If you use something super smooth, like Skippy, it will come together more easily.  You could really use any kind of nut butter, such as almond butter, if you prefer. Once it's mixed, it will look something like this:


It will look kind of watery, but stay with me!

Melt some coconut oil or butter in a large pan over medium-high heat.  You'll know that the pan is hot enough when cold water sprinkled on the pan "dances."  I check this by wetting the tips of my fingers with cold water and spraying it onto the pan.  If the water hops off the pan, then it's hot enough.  If not, increase the heat a bit.  

Pour about two tablespoons of batter onto the pan for each pancake.  I find it helpful to keep them on the small side, since they are fairly delicate.  


This would be the perfect time to add chocolate chips if you're using them! Really, I don't know what I was thinking NOT using them.  

Cook them for a few minutes on this side and then flip them. You'll know they're ready to be flipped when the edges start to firm up and you start to see bubbles popping in the center of the pancake.


Cook them for a few minutes on this side and then remove them from the pan.  I like to keep them on an oven safe plate in a warm oven while I continue to make the rest of the pancakes.  This amount of batter makes about 8-9 pancakes.  

Serve them piping hot with butter and syrup, or your favorite topping.  Enjoy!  


Gluten Free Peanut Butter Banana Pancakes
Adapted from The Mogul Mom
Serves 1-2

2 bananas, mashed
2 tablespoons peanut or almond butter
2 eggs, beaten

In a small mixing bowl, mix the bananas, nut butter, and eggs.  Melt 1 tablespoon coconut oil or butter in a large frying pan over medium-high heat.  Pour 2 tablespoons batter into the frying pan to form 1 pancake; continue to fill pan.  Cook for several minutes or until the edges begin to firm up and bubbles pop in the center of the pancake.  Flip and cook for several minutes on the other side.  Remove from the pan.  Serve hot, with butter and syrup.  

Shared on Slightly Indulgent Tuesday

Friday, April 12, 2013

Friday Food Finds


The cherry blossoms are finally here, the weather is warm, and my one of my closest friends is visiting this weekend.  All seems OK with the world.  Happy Friday.

Spicy Lentil Summer Rolls
Sunday Morning Pancakes
A Spring Salad
Toasted Maple Sesame Nuts
Black Bean and Potato Nachos

Tuesday, April 9, 2013

Chia Fresca + Cherry Blossom


Spring Summer has finally arrived in DC.  Exactly two weeks ago yesterday, it was in the 30s and snowing.  Snowing.  Today, we enjoyed sunny, 80 degree weather. Tomorrow the high will push 90.  After an unseasonably cold spring, this warm weather has helped the cherry blossoms come out of hibernation and show us their beautiful blooms.  And thank goodness, because cherry blossom season means running season, and the flowers make for such nice scenery.  


This weekend I once again completed the Cherry Blossom 10-miler, a road race that's part of the annual Cherry Blossom festival.  Last year's race was my first long-distance road race, and once I felt the high of crossing the finish line, I was hooked.  This year's race was a bit more difficult.  My training went smoothly enough until I came down with a terrible cold about two weeks before the race.  During that two weeks, the most I could muster was a 2.5 mile run that did not go very well.  Thankfully, my previous training and lots of rest paid off, my lungs and legs cooperated, and I completed the race only minimally slower than last year.  My results weren't impressive by any means, but finishing is winning, right??

To help keep me healthy and strong during my training, I started making Chia Fresca, a delicious beverage suspended with chia seeds.  I first heard about it in "Born to Run" by Christopher McDougall.  It's a book explaining the idea that human's bodies are made to run long distances, more so than any other animal.  The first hunter-gatherers even hunted their prey by chasing them on foot until they collapsed.  To me, there's something so encouraging about this idea.  Running long distances may be difficult at first, but it shouldn't be approached as something foreign and strange to our bodies - we were born to do it.  And doesn't that take away a lot of the fear and confusion about running?

Specifically, "Born to Run" is about an indigenous people in Mexico, the Tarahumara, who are epic runners.  They can run for days, and one of their secrets is drinking this concoction.  According to McDougall:

"...a tablespoon of chia is like a smoothie made from salmon, spinach, and human growth hormone.  As tiny as those seeds are, they're superpacked with omega-3s, omega-6s, protein, calcium, iron, zinc, fiber, and antioxidants...Chia was once so treasured, the Aztecs used to deliver it to their king in homage.  Aztec runners used to chomp chia seeds as they went into battle, and the Hopis fueled themselves on chia during their epic runs from Arizona to the Pacific Ocean."

Not only is chia crazily good for you, but it tastes great in Chia Fresca.  To make it, combine 1 tablespoon chia seeds and 1/4 cup of water in a sealable container.  


Close the lid tightly and shake the seeds to break up any clumps.  No one wants a mouthful of clumpy chia, so don't forget this step!  Let it soak for at least ten minutes or as long as overnight (refrigerating it if it's the latter).  When it's done, it will look like this:


The chia seeds will have soaked up most of the water and a thick gel will have formed.  Don't worry about adding too much water - it's totally fine to eyeball it.  If there's too much, you'll just have less water to add later, so no big deal.

Now take a large glass and squeeze a generous sized slice of lemon or lime into it.


Add a teaspoon or two of honey, and then pour in the chia seeds:


Note here that I went a little overboard with the amount of chia seeds in this one.  If you really only use one tablespoon of seeds, you'll probably have a little less than what's pictured here.  I guess I need to stop being lazy and start measuring!

Now stir that baby like crazy.  It takes a while for the honey to incorporate itself into the rest of the drink, but it will eventually.  Once it's mostly incorporated, fill the rest of the glass up with water (or sparkling water (my personal favorite) or coconut water).  Stir it a bit more, and voila!  A delicious energy drink (McDougall calls it "home-brewed Red Bull.")  So good, and so easy.  


A couple notes: The chia seeds don't completely dissolve, so it does have a bit of texture.  If you're a person who has an issue with texture, this might be weird at first, but give it a try!  Also, the seeds might separate after a few minutes, but a quick stir will bring it back together.  I've found that this happens less with sparkling water.  

Enjoy, and start running! 

Thursday, April 4, 2013

Sweet Potato, Black Bean, and Kale Tacos


Spring weather can be so weird.  One day it's warm and you only need a light jacket, but the next it's snowing and windy and you need your puffy winter coat once again.  This spring in particular seems colder than ever, which might be due to actual temperature or might just be due to my decreasing tolerance to chill.  Last year, it seemed like my training for the Cherry Blossom 10 mile race was much warmer than that of this year; I've been wearing multiple layers for the past few weeks.  Plus, after years of living in the South, my blood has definitely thinned and I'm so much more sensitive to cold than my New England upbringing should allow.  

With such fickle weather, hearty cold weather dishes hardly seem appropriate, yet light warm weather dishes don't fit the bill either.  Enter: cold weather tacos.  Inspired by GP's March Goop "One Pan Meals," these sweet potato, black bean, and kale tacos strike just the right balance between comfort food and light fare.  They're spritzed with lime juice, served in warm tortillas, and topped with sour cream and avocado, so they have all the great aspects of a taco, yet encompass the soft, warm characteristics of comfort food, so they're perfect for a cool day.  

To make them, peel and cube a sweet potato into bite size pieces.  Heat olive oil in a large pan over medium-high heat and add the cubes of sweet potato.  Stir occasionally, and cook until soft and slightly browned.  Add a can of black beans, drained and rinsed, and cook until warmed.  Season with sumac (if you have it - this can easily be skipped if you don't), cumin, salt, and pepper.  


Prepare several stalks of kale by rinsing it, tearing off the stems and large veins, and ripping it into small pieces.


Add a couple extra tablespoons of olive oil to the pan and add the kale to the sweet potato/black bean mixture.  Stir occasionally until the kale has cooked down.  


Continue stirring until the kale is completely wilted.


Serve the mixture in a warm tortilla.  Squeeze a wedge of lime over the ingredients and top with a dollop of sour cream and slice of avocado.


One thing I like about this dish is that it can be eaten as a taco or you can enjoy only the filling in a bowl if you prefer.  I did this with leftovers, but still topped it with lime, sour cream, and avocado.  Delicious and so portable.

Enjoy, and start preparing for warmer weather!

Sweet Potato, Black Bean, and Kale Tacos
Adapted from Goop

2 small sweet potatoes, peeled and cubed
1 can black beans, rinsed and drained
2 handfuls kale
3-4 tablespoons olive oil
Pinch of sumac
Pinch of cumin
Salt and pepper to taste
Small tortillas
1 lime
1 avocado
Sour cream

In a large saucepan, heat 2-3 tablespoons olive oil over medium-high heat.  Add the sweet potato and cook about 10 minutes, stirring frequently.  Add black beans and cook for 5 minutes longer.  Season with sumac, cumin, salt, and pepper.  Meanwhile, rinse the kale, remove all stems and large veins, and tear into bite size pieces. Once sweet potato and black beans are done, add an additional 1-2 tablespoons olive oil to the pan and add kale. Stir occasionally until kale is completely wilted.  Serve taco mixture on warm tortillas, squirted with lime and with a dollop of sour cream and slice of avocado.
 
site design by designer blogs